• Zombie Brains

    Materials

    • Premier Parfait Chunky (Blue 12 yds, Purple 15 yds, Pink 5 yds, Green 15 yds)
    • Sizes 3.5 & 4.0 mm hook
    • Plastic Tapestry Needle
    • Stress Ball (1.8″)
    • White & Black Medium Weight Yarn for Eyes

    Stitches

    • sc – single crochet
    • inc – single crochet increase
    • dec – single crochet decrease
    • ch – chain
    • flo – front loop only
    • blo – back loop only
    • sl st – slip stitch
    • 4dc bobble – yarn over, insert hook into stitch, yarn over, pull through the stitch, yarn over, pull through two loops on hook. Repeat until there are five loops on the hook. Yarn over and pull through all five loops

    This pattern was made with the yarn under, yarn over technique.

    After inserting your hook through the stitch grab the yarn so that it is under the hook (see picture) instead of wrapping it over the hook. This creates a shorter, denser stitch for amigurumi. It will affect gauge

    The pattern is worked in continuous rounds

    The finished object from this pattern is not intended for children under 3

    For the PDF Click Here

    Eyes (Make 2)

    3.5 mm hook and acrylic yarn

    White Yarn

    Round 1: 8 sc in magic circle , slip stitch into first stitch of round[8]

    Fasten Off. Add a pupil with black acrylic yarn

    Arms (Make 2)

    Worked Continuously

    Green Yarn

    Round 1: 6 sc in magic circle [6]

    Round 2: sc around [6]

    Switch to Purple Yarn

    Rounds 3-6: sc around [6] 4 rounds

    Stuff Lightly

    Sc through both sides of the arm

    Fasten Off, Leave a long tail for sewing.

    Note: From this point forward you will be using the 4.00mm hook and Premier Parfait Chunky yarn

    Zombie Head

    Worked Continuously

    Green Yarn

    Round 1: 8 sc in magic circle [8]

    Round 2: (sc, inc) x 4 [12]

    Round 3: sc around [12]

    Round 4: (sc, inc) x 6 [18]

    Round 5: sc around [18]

    Round 6: 6sc, 4dc bobble, 8sc, 4dc bobble, 2sc [18]

    Round 7: sc around [18]

    Note: Place a stitch marker in the back loop of the first stitch of Round 8.

    Round 8: flo sc around [18]

    Fasten Off Green Yarn

    Attach Pink Yarn to the back loop of round 8, where you put the marker

    Round 8: blo sc around [18]

    Round 9: sc around [18]

    Sew on eyes and embroider mouth at this time.

    Insert a little bit of stuffing in the bottom of the head, place stress ball on top

    Round 10: (sc, dec) x 6 [12]

    Round 11: (dec) x 6 [6]

    Fasten Off, DO NOT close hole, weave in end

    Note: If you want to make a regular zombie without the stress ball. Skip note about stress ball after Round 9. Stuff head after Round 10. Fasten Off and close hole after Round 11.

    Zombie Body

    Worked Continuously

    Green Yarn

    Legs (Make 2)

    Round 1: 8 sc in magic circle [8]

    Rounds 2-3: sc around [8] 2 rounds

    Switch to Blue Yarn

    Rounds 4-8: sc around [8] 5 rounds

    Fasten Off first leg, leaving a tail for sewing, do not fasten off second leg

    Joining the legs

    Round 9: Line up the legs, sc in the 1st leg (place marker, this is the new start for the round), sc 7 in the 1st leg, go back to the 2nd leg, sc 8.

    Sew up hole between legs using tail from first leg

    Rounds 10-11: sc around [16] 2 rounds

    Stuff legs

    Switch to purple yarn

    Rounds 12-17: sc around [16] 6 rounds

    Stuff

    Round 18: (dec) x 8 [8]

    Finish stuffing

    Fasten Off, leave a long tail for sewing. Thread through the front loops of the remaining stitches, pull closed.

    Sew head to the body, right behind the chin. It’s okay if it’s floppy since it’s a zombie.

    Sew arms to body.

    Enjoy!!

    For the PDF Click Here

  • Stress Eyeball

    Materials

    • Premier Parfait Chunky, White 9yds, Blue 3yds, Red 4yds
    • Size 4.0 mm hook
    • Stress Ball (1.8″)
    • Plastic Tapestry Needle

    Stitches

    • sc – single crochet
    • inc – single crochet increase
    • dec – single crochet decrease
    • sl st – slip stitch
    • ch – chain

    This pattern was made with the yarn under, yarn over technique.

    After inserting your hook through the stitch grab the yarn so that it is under the hook (see picture) instead of wrapping it over the hook. This creates a shorter, denser stitch for amigurumi. It will affect gauge

    The pattern is worked in continuous rounds.

    The finished object from this pattern is not intended for children under 3

    For the PDF Click Here

    Eyeball

    Blue Yarn or Eye color of your choice

    Chain 6, slip stitch back into first chain.

    Note: In Round 1, Chain 1 does not count as a stitch

    Round 1: Chain 1, 12sc into circle [12]

    Switch to White Yarn

    Note: From this point forward, you will be working in continuous rounds, place a stitch marker on the first stitch. Take a moment to weave in the ends from the blue yarn, you want it be nice and secure.

    Round 2: (sc, inc) x 6 [18]

    Rounds 3-6: sc around [18] 4 rounds

    Place the stress ball inside the eyeball.

    Round 7: (sc, dec) x 6 [12]

    Round 8: (dec) x 6 [6]

    Fasten Off. Close up hole, thread through the front loop of the remaining stitches, pull closed and weave in end.

    Optic Nerve

    Red Yarn

    Slip Stitch into back of eyeball.

    Chain 9, In 2nd stitch from hook 3sc, 3sc in each remaining chain. Slip stitch back into original stitch

    Fasten Off. Leave a long tail to use for embroidering veins.

    Veins

    Using the tail from the optic nerve, embroider veins.

    Make sure to use a plastic tapestry needle so you don’t poke a hole into the stress ball.

    I used backstitch to embroider the veins.

    Weave in Ends

    Enjoy!!

    For the PDF Click Here

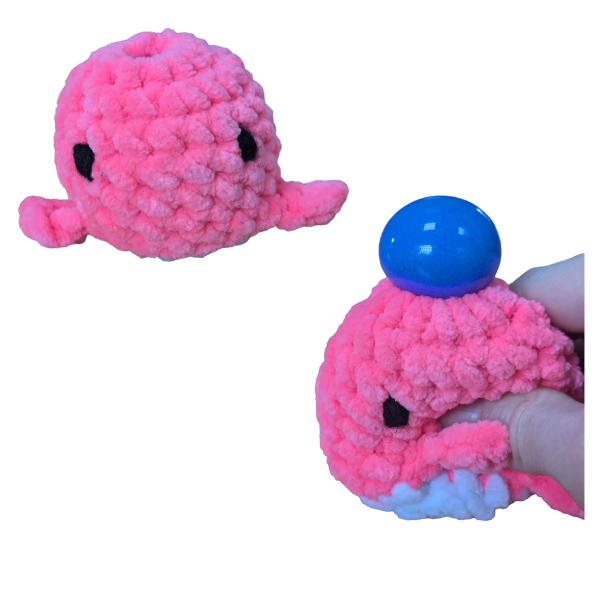
  • Stress Whale

    Materials

    • Premier Parfait Chunky, Pink (16 yds) White (1 yd)
    • Size 4.0 mm hook
    • Plastic Tapestry Needle
    • Stress Ball (1.8″)
    • Black Medium Weight Yarn for Embroidering Eyes

    Stitches

    • sc – single crochet
    • inc – single crochet increase
    • dec – single crochet decrease
    • blo- back loop only
    • 4 dc bobble – yarn over, insert hook into stitch, yarn over, pull through the stitch, yarn over, pull through two loops on hook. Repeat until there are five loops on the hook. Yarn over and pull through all five loops

    This pattern was made with the yarn under, yarn over technique.

    After inserting your hook through the stitch grab the yarn so that it is under the hook (see picture) instead of wrapping it over the hook. This creates a shorter, denser stitch for amigurumi. It will affect gauge

    The pattern is worked in continuous rounds

    The finished object from this pattern is not intended for children under 3

    For the PDF Click Here

    Whale

    Chain 6, slip stitch back into first chain.

    Note: In Round 1, Chain 1 does not count as a stitch

    Round 1: Chain 1, 12sc into circle [12]

    Note: From this point forward, you will be working in continuous rounds, place a stitch marker on the first stitch.

    Round 2: (sc, inc) x 6 [18]

    Rounds 3-5: sc around [18] 3 rounds

    Place a stitch markers in the back loops of the 5th, 13th and 18th stitches of the round.

    Fin: flo (sl st, chain 3, sc in 2nd chain from hook, sc in last chain, sl st back into original flo stitch of body)

    Tail: All in the same flo stitch (4dc bobble, sl st, 4dc bobble, sl st)

    Round 6: 4sc, flo Fin, 7sc, flo Fin, 4sc, flo Tail

    Fasten off main color yarn. Use the tail of the main color to sew up the hole made by the bobbles.

    Switch to White Yarn, attach yarn to the back loop of the first stitch. All stitches will be working in the back loop for round 7, using the back loops marked in round 6 for the fins and tail.

    Take a moment to weave in the ends from the main color and white.

    Place the stress ball inside the whale.

    Round 7: blo (sc, dec) x 6 [12]

    Round 8: (dec) x 6 [6]

    Fasten Off. Close up hole, thread through the front loop of the remaining stitches, pull closed and weave in end.

    Eyes

    With the Black Acrylic Yarn and plastic tapestry needle, embroider two eyes.

    I make 3-4 vertical stitches between rounds 3 & 4. I put the eyes one stitch over from the fins.

    Weave in ends.

    Enjoy!!

    For the PDF Click Here

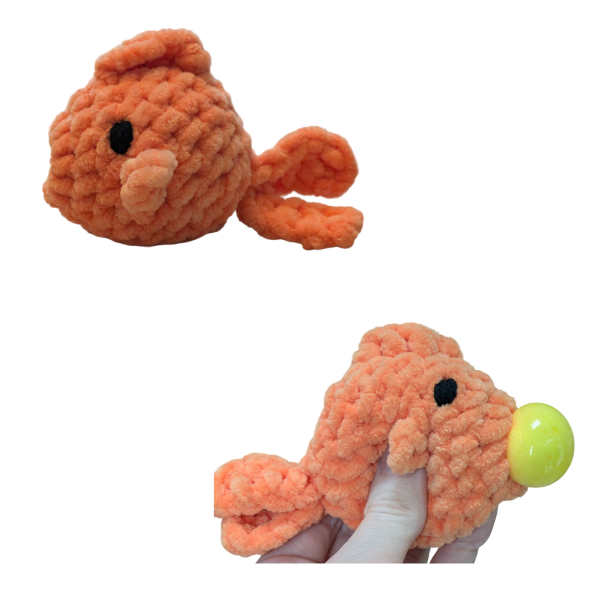
  • Stress Fish

    Materials

    • Premier Parfait Chunky, Orange 16 yds
    • Size 4.0 mm hook
    • Plastic Tapestry Needle
    • Stress Ball (1.8″)
    • Black Medium Weight Yarn for Embroidering Eyes

    Stitches

    • sc – single crochet
    • inc – single crochet increase
    • dec – single crochet decrease
    • hdc – half double crochet
    • dc – double crochet
    • sl st – slip stitch
    • chain
    • blo – back loop only
    • flo – front loop only

    This pattern was made with the yarn under, yarn over technique.

    After inserting your hook through the stitch grab the yarn so that it is under the hook (see picture) instead of wrapping it over the hook. This creates a shorter, denser stitch for amigurumi. It will affect gauge

    The pattern is worked in continuous rounds

    The finished object from this pattern is not intended for children under 3

    For the PDF Click Here

    Fish

    Chain 6, slip stitch back into first chain.

    Note: In Round 1, Chain 1 does not count as a stitch

    Round 1: Chain 1, 12sc into circle [12]

    Note: From this point forward, you will be working in continuous rounds, place a stitch marker on the first stitch.

    Round 2: (sc, inc) x 6 [18]

    Round 3: sc around [18]

    Place a stitch markers in the back loops of the 5th and 14th stitches of the round.

    Fin: flo (sl st, chain 3, hdc in 3rd chain from hook, sl st back into original flo stitch of body)

    Round 4: 4sc, Fin, 8sc, Fin, 4sc

    Round 5: 4sc, sc in blo from round 3 (where marker is), 8sc, sc in blo from round 3 (where marker is), 4sc [18]

    Rounds 6-7: sc around [18] 2 rounds

    Place the stress ball inside the fish.

    Round 8: (sc, dec) x 6 [12]

    Round 9: (dec) x 6 [6]

    Fasten Off. Close up hole, thread through the front loop of the remaining stitches, pull closed and weave in end.

    Top Fin

    Attach yarn on the top of the fish between rounds 3 & 4. For each stitch you will be moving down a round on the body of the fish

    Chain 3, dc, dc, hdc, slip stitch back into the same stitch as the hdc.

    Fasten Off. Weave in ends.

    Tail

    Attach yarn to the back of the fish, starting at the bottom.

    Chain 5

    In the second chain from the hook, dc. In the following chains dc, hdc, hdc, slip stitch back into original stitch in the whale.

    Repeat for the second part of tail.

    Fasten Off. Weave in ends.

    Eyes

    With the Black Acrylic Yarn and plastic tapestry needle, embroider two eyes.

    I make 3-4 vertical stitches between rounds 3 & 4.

    Weave in ends.

    Enjoy!!

    For the PDF Click Here

  • Stress Chicken

    Materials

    • Premier Parfait Chunky (White 16 yds, Orange 1 yd)
    • Size 4.0 mm hook
    • Stress Ball (1.8″)
    • Plastic Tapestry Needle
    • Black Medium Weight Yarn for embroidering eyes

    Stitches

    • sc – single crochet
    • inc – single crochet increase
    • dec – single crochet decrease
    • flo – front loop only
    • hdc – half double crochet
    • sl st – slip stitch
    • chain
    • 5 dc bobble – yarn over, insert hook into stitch, yarn over, pull through the stitch, yarn over, pull through two loops on hook. Repeat until there are six loops on the hook. Yarn over and pull through all six loops

    This pattern was made with the yarn under, yarn over technique.

    After inserting your hook through the stitch grab the yarn so that it is under the hook (see picture) instead of wrapping it over the hook. This creates a shorter, denser stitch for amigurumi. It will affect gauge

    The pattern is worked in continuous rounds

    The finished object from this pattern is not intended for children under 3

    For the PDF Click Here

    Chicken

    White Yarn

    Round 1: 8 sc in magic circle [8]

    Round 2: (sc, inc) x 4 [12]

    Round 3: sc around [12]

    Round 4: (sc, inc) x 6 [18]

    Round 5: sc around [18]

    Place a stitch marker in the back loops of the 9th and 18th stitches of the round.

    Round 6: 8sc, flo (3hdc in same stitch), 8sc, flo (3hdc in same stitch)

    Round 7: 8sc, sc in the back loop from round 6 where your marker is, remove marker from back loop, 8sc, sc in the back loop from round 6 where your marker is, remove marker from back loop [18]

    Round 8: sc around [18]

    Place the stress ball inside the chick. Bobble is done with orange yarn. You may have to move a stitch or two to adjust bobble placement. Bobbles should be a stitch away from the wings.

    Round 9: In white dec, (sc, dec) x 2, dec, switch to orange 5dc bobble, switch to white sc, dec, sc, switch to orange 5dc bobble, switch to white, dec [12]

    When cutting the orange yarn I leave a long tail and use it to embroider the beak. I place 3 horizontal stitches between rounds 4&5 using a plastic tapestry needle. Weave in orange ends.

    Round 10: (dec) x 6 [6]

    Fasten Off. Leave hole, weave in end.

    Using Black Yarn and a plastic tapestry needle, embroider eyes between rows 3 & 4, 3 stitches apart.

    Enjoy!!

    For the PDF Click Here

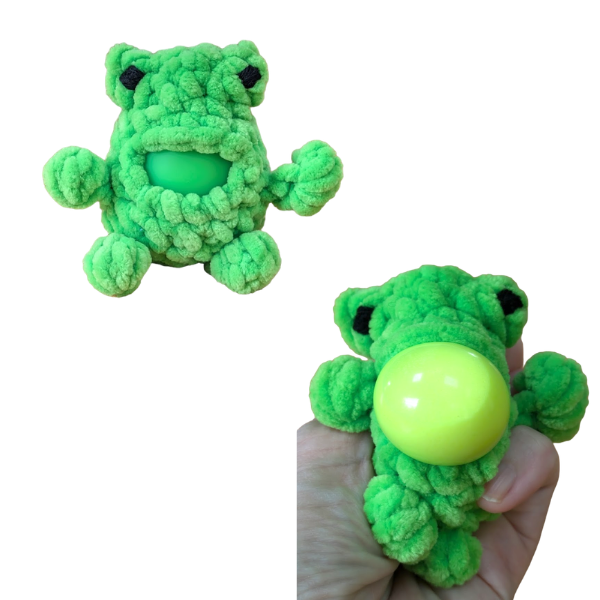
  • Stress Frog

    Materials

    • Premier Parfait Chunky (about 16 yds)
    • Size 4.0 mm hook
    • Plastic Tapestry Needle
    • Stress Ball (1.8″)
    • Black Medium Weight Yarn
    • for embroidering eyes

    Stitches

    • sc – single crochet
    • inc – single crochet increase
    • dec – single crochet decrease
    • 4 dc bobble – yarn over, insert hook into stitch, yarn over, pull through the stitch, yarn over, pull through two loops on hook. Repeat until there are five loops on the hook. Yarn over and pull through all five loops
    • 5 dc bobble – yarn over, insert hook into stitch, yarn over, pull through the stitch, yarn over, pull through two loops on hook. Repeat until there are six loops on the hook. Yarn over and pull through all six loops

    This pattern was made with the yarn under, yarn over technique.


    After inserting your hook through the stitch grab the yarn so that it is under the hook (see picture) instead of wrapping it over the hook.
    This creates a shorter, denser stitch for amigurumi. It will affect gauge


    The pattern is worked in continuous rounds


    The finished object from this pattern is not intended for children under 3

    For the PDF Click Here

    Frog

    Starting at the top of the head

    Round 1: 8 sc in magic circle [8]

    Round 2: 2sc, 5dc bobble, 3sc, 5dc bobble, sc [8]

    Round 3: (sc, inc) x 4 [12]

    Round 4: (sc, inc) x 6 [18]

    Round 5: sc, chain 4, skip the next 4 stitches, 13sc [18]

    Note: Make sure the chain 4 lines up in the middle of the frog, it’s where the stress ball will come out. You may have to adjust the placement based on your tension.

    Round 6: sc, 4sc in chain space, 13sc [18]

    Round 7-8: sc around [18] 2 rounds

    Stuff with Stress Ball. FYI: the stress ball will not reach the eye area.

    Round 9: (sc, dec) x 6 [12]

    Round 10: (sc, dec) x 4 [8]

    Thread yarn through the front loops of stitches and close hole. Weave in end. Use a plastic needle so you don’t make a hole in the stress ball

    Arms (Make 2)

    Slip Stitch into frog (between rounds 5&6 for the left arm and between rounds 6&7 for the right arm)

    Chain 3

    Place a 4dc bobble in 2nd chain from hook, slip stitch into 2nd chain from hook (this anchors your bobble), slip stitch into next chain and slip stitch back into the frog

    Fasten Off. Weave in ends. Pop out bobble using your finger, just to get it a little rounder.

    Legs (Make 2)

    Slip Stitch into frog (stay in line with the arms, place 4 rows below arms)

    Chain 5

    Place a 4dc bobble in 2nd chain from hook, slip stitch into 2nd chain from hook (this anchors your bobble), slip stitch into remaining chains and slip stitch back into the frog

    Fasten Off. Weave in ends.

    Eyes

    With the Black Acrylic Yarn, embroider two eyes.

    I make 3-4 horizontal stitches around the leg of a double crochet in the eye.

    Weave in ends.

    Enjoy!!

    For the PDF Click Here